Saturday, January 31, 2009

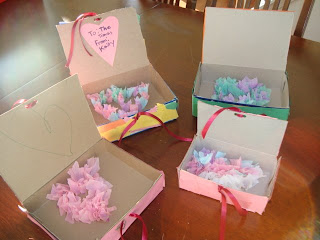
Valentine's Day Box


Supplies
· Empty Cracker or Granola Bar Box
· Ribbon (about 2 feet)
· Tissue Paper
· Scraps of Construction Paper
· Stapler
· White Glue or Glue Stick
· Pen or Pencil
· Scissors
· Hole Punch

Directions
1. Cut the front of the box along three sides with your scissors.
2. Staple the sides of the box, in order to hold the box together.
3. Cover the box by using the glue and construction paper. This is where the fun comes in. You can tear the paper or use large pieces of paper, be creative. Decorate the box with hearts, buttons, or ribbon.
4. Draw a heart with your pen or pencil on the inside of the box.
5. Cut the tissue paper into 2”x2” squares.
6. Wrap the tissue paper around the flat end of a pen or pencil and dip into your glue. Gently place the pen/pencil with the tissue paper onto the heart, which you drew in your box. Remove the pen/pencil. Repeat this process until your heart is complete. (It was easier using a glue stick for this process.)
7. Add any hearts, notes, pictures or decorations inside the box.
8. With your hole punch, punch two holes in the middle front of the lid, about ½” apart and two holes on the front of the box ½” apart. Make sure the holes lines up with each other.
9. Cut two 12” pieces of ribbon. Lace one piece of ribbon into the two holes on the lid and tie in a knot in the middle of the ribbon. Lace the other piece of ribbon into the two holes on the front of the box and knot in the middle of the ribbon.
10. To keep the box closed, tie the ribbons together.
11. Great Job! You did it!!

Monday, January 26, 2009


Supplies

Empty Oatmeal Container (42 ounces)
4 Pieces Pink Paper (50 lb weight)
Pink Tissue Paper
Markers
Valentines Day/Heart Stamp and Ink
Scissors
Glue
Stapler
Tape
Directions

1. On two pieces of pink paper, stamp hearts/Valentine’s Day stamps or decorate with markers.
2. Tape onto the oatmeal container to cover it. Trim off the extra paper.
3. Bend the lid and cut out half of the middle of the lid for an opening to insert Valentine’s Day cards. (adults only)
4. Trace or print the heart cut-out onto pink paper and cut out with scissors.
5. Glue the heart onto pink piece of tissue paper one inch larger than the heart. Cut out around the heart, so that you can see the pink tissue paper on the back of the heart. Write “Happy Valentine’s Day” on the heart. (Set aside)
6. Trace or print on pink paper the two pieces for the mouth and head. Cut out the shapes.
7. Staple the mouth onto the lid on each side and the back. (The opening in the lid should be in the front.)
8. Staple the face onto the sides and back of the lid.
9. Cut out two 6” x 1” strips of pink paper. Fold in an accordion manner every inch. Glue one on each eye.
10. Cut two 2” tissue paper hearts and glue to the paper accordion on the eyes.
11. Cut two 8” x 1” strips of pink paper. Fold one side under 1” and glue to the side of the container for arms. Do the same to the other side and glue to the center of the container where the two meet.
12. Glue the heart that you set aside in Step #5 in the middle of the container where the arms meet.
13. Cut out a 3” x 8” piece of tissue paper and round one end off to make a tongue. Roll the tongue around a pencil so it will curl up. Tape the tongue to the inside of the opening of the lid.
14. Great Job!! Your Valentine’s Day container is ready to eat up lots of Valentine’s Day cards.

Valentine's Day Container

Supplies


Empty Oatmeal Container (42 ounces)
4 Pieces Pink Paper (50 lb weight)
Pink Tissue Paper
Markers
Valentines Day/Heart Stamp and Ink
Scissors
Glue
Stapler
Tape


Directions


1. On two pieces of pink paper, stamp hearts/Valentine’s Day stamps or decorate with markers.
2. Tape onto the oatmeal container to cover it. Trim off the extra paper.
3. Bend the lid and cut out half of the middle of the lid for an opening to insert Valentine’s Day cards. (adults only)
4. Trace or print the heart cut-out onto pink paper and cut out with scissors.
5. Glue the heart onto pink piece of tissue paper one inch larger than the heart. Cut out around the heart, so that you can see the pink tissue paper on the back of the heart. Write “Happy Valentine’s Day” on the heart. (Set aside)
6. Trace or print on pink paper the two pieces for the mouth and head. Cut out the shapes.
7. Staple the mouth onto the lid on each side and the back. (The opening in the lid should be in the front.)
8. Staple the face onto the sides and back of the lid.
9. Cut out two 6” x 1” strips of pink paper. Fold in an accordion manner every inch. Glue one on each eye.
10. Cut two 2” tissue paper hearts and glue to the paper accordion on the eyes.
11. Cut two 8” x 1” strips of pink paper. Fold one side under 1” and glue to the side of the container for arms. Do the same to the other side and glue to the center of the container where the two meet.
12. Glue the heart that you set aside in Step #5 in the middle of the container where the arms meet.
13. Cut out a 3” x 8” piece of tissue paper and round one end off to make a tongue. Roll the tongue around a pencil so it will curl up. Tape the tongue to the inside of the opening of the lid.
14. Great Job!! Your Valentine’s Day container is ready to eat up lots of Valentine’s Day cards.

Tuesday, January 20, 2009


Supplies Needed:


  • Empty Oatmeal Container (42 ounces)


  • Empty Plastic Fruit or Applesauce Container (3.9 ounces)


  • Print-Out of Snowman Parts or 1 pc Orange Construction Paper, 1 pc Black Construction


  • Paper, 1 pc Brown Construction Paper


  • 2 pc of White Paper, 8 ½” x 11”


  • Ribbon or Yarn


  • Tissue Paper, 12” x 12”


  • Hot Glue Gun


  • Glue Stick


  • Scissors


  • Tape


  • Hole Punch


Directions:


1. Glue the empty applesauce container in the center of the lid of the empty oatmeal container with hot glue (adults only).
2. Tape the white paper onto the oatmeal container to cover the container. Trim off the extra.
3. Cut out the black heart shape or cut out a 6 ½” heart from the black construction paper and glue onto the bottom of the container. Leave the top of the heart shape sticking out for the snowman’s shoes.
4. For the eyes, cut out and glue the small black circles or cut ¾“-diameter circles from the black construction paper. With the hole punch, punch out two white circles and glue them on for the center of the eyes.
5. Cut out the orange triangle from the print-out or cut out a 2 ½“-tall triangle from the orange construction paper and fold along the dotted line (or about ½“ from the bottom of the triangle) for the snowman’s nose. Glue it onto the oatmeal container below the eyes.
6. Punch seven black circles with the hole punch and glue on for the mouth.
7. Cut out the three black 1” circles from the print-out or black construction paper and glue down the center for the buttons.
8. Tie the ribbon or yarn (three pieces about 34” long tied together on each end) around the container, under the mouth and above the buttons.
9. Cut out the two brown arms or cut two 6” x 1” strips out of brown construction paper and cut a “V” on one end to make hands. Fold along the dotted line or fold the construction paper arms about an inch from the straight end. Glue one to each side of the snowman.
10. Scrunch up the tissue paper and flatten out again. Glue to the top of the container for its hat.
11. You are done!! Great Job!!